If you are using my linkage outlined in Triggering Homeseer from Blue Iris And are looking for way to grab the Blue Iris data for a sheet (I have a sheet that allows me to check which devices are using in events, scripts and by Blue Iris) then you might want to look at this script.
Note I have 4 servers now as I've been upgrading cams again.
Also note you will need linux or a linux command line tools package like Cygwin for this shell script
From regedit I export [HKEY_LOCAL_MACHINE\SOFTWARE\Perspective Software\Blue Iris\Cameras] to the hostname.reg in the folder with the script.
Download it from here if you have trouble copying it to a file. Change the orange bits to match your set up. Note ^M is a control M
rm -f cams.csv
echo host,shortname,dsname,fullxres,fullyres,HS3ref,vcodec,folder,enabled,group >
cams.csv
set -x
for host in BlueIris2 BlueIris3 BlueIris4 BlueIris5
do
iconv -f UTF-16LE -t UTF-8 ${host}.reg | grep -E "\"enabled\"|\"group\"|shortname|dsname|fullxres|fullyres|&value=3|\"vcodec\"|\"folder\"" | sed -e "s|10.10.1.45/JSON?user=userName&pass=P@ssw0rd&request=controldevicebyvalue&ref=||g" | sed -e "s|&value=3||g" > ${host}.raw
echo ======== Raw =========
cat ${host}.raw
echo ======== Raw =========
## remove unneeded stuff and add missing fields from Tinycam
cut -f2-20 -d'=' ${host}.raw | sed -e "s|^M||g" | sed -e "s|cameraId=1538607685:1\"|cameraId=1538607685:1\"\ndword:00000280\ndword:000001e0|g" | sed -e "s|dword:||g" > ${host}.tmp
echo ======== Tmp =========
cat ${host}.tmp
echo ======== Tmp =========
fmt="$host,%s,%s\\n"
awk -v fmt="$host,%s,%s,%s,%s,%s,%s,%s,%s,%s,%s,%s,\\n" '{getline b;getline c;getline d;getline e;getline f;getline g;getline h;getline i;getline j;getline k;getline l;getline m;getline n;getline o;getline p;getline q;getline r;printf(fmt,c,d,e,f,g,h,$0,p,q,r,b)}' ${host}.tmp 2>&1 >> cams.csv
echo ======== Cams =========
done
cat cams.csv
It outputs cams.csv which Excel and such can open as a sheet. I uploaded an example here.
Showing posts sorted by relevance for query blue iris. Sort by date Show all posts
Showing posts sorted by relevance for query blue iris. Sort by date Show all posts
Monday, April 1, 2019

Thursday, November 1, 2018
Etekcity WiFi Smart Plug
Test Etekcity WiFi Smart Plug, Voltson Mini Outlet with Energy Monitoring (2-Pack), No Hub Required, ETL Listed, White, Works with Alexa, Google Home and IFTTT
So far have not found an API to allow Homeseer to talk to them directly though you can easier connect them via IFTTT. Note however I found I needed to reconnect IFTTT to Etekcity at least once so far to get things working again even though no errors seemed to be reported anywhere in the chain. So a heartbeat system might be in order.
Update:
I did find this sample code for control via Python you might find useful for creating a plugin or bridge. There is no documentation I could find for this API and the examples people have posted seems to vary some but I was able to use it to create a Homeseer VB script documented at the end of this post. While still cloud based it is working as I write (update) this while the IFTTT still appears to be broken over 2 weeks past my original post.Create Homeseer device
First you will want to create a virtual device in Homeseer. Since this maker supports state change triggers for off. on, online and offline make it dimmable

and with and status values like this.

Link through IFTTT
Note it might take IFTTT a few minutes to pick up changes so best if create your virtual devices all up front then wait a bit for proceeding.
As with all such IFTTT linkages you will want at least and off and on IFTTT applet for each direction. In this case we will also want a 5th applet to send offline notices back to Homeseer.
First to control the plug when the Homeseer device changes create and applet like this

To go back the other way create on like this

Note about the time I started writing this the IFTTT Etekcity linkage seems to have quit working. Checking back a week later it is still not working.
While you can install python and required modules then modify the scripts to be called from Homeseer events (I did this as a test) you lose logging and remote editing options so I did the work of converting it to VB. vesync.vb us pretty much standalone but I keep all my logins in a seperate file to make sharing easier.
To leverage the above objects in GUIs I created on and off events triggered state change of the matching virtual object (see above). They should look something like this


Note for triggers I'm using MyMonitor to set Homeseer virtuals based on state info from Blue Iris. You could also use the Blue Iris Plug-In by Highpeak Software plugin. I have multiple Blue Iris servers though and the Highpeak plugin only supports one. Also MyMonitor can run on a seperate PC which can be helpful if load or number of plugins is an issue. Plus of course MyMonitor lets you monitor about anything accessible from the network and it is open source / free to use.
The hidden API way
As mentioned above I found a very few posts claiming "direct control" (still through Vesync servers) of the plugs. Many refer to hosts and ports that seem to be incorrect or no longer active. But I did get this sample code for control via Python to work.While you can install python and required modules then modify the scripts to be called from Homeseer events (I did this as a test) you lose logging and remote editing options so I did the work of converting it to VB. vesync.vb us pretty much standalone but I keep all my logins in a seperate file to make sharing easier.
To leverage the above objects in GUIs I created on and off events triggered state change of the matching virtual object (see above). They should look something like this

Lastly add a reset event
Then you can add a rest event to tie it all together. Note since this controls the virtuals and the virtuals trigger controls this works with the IFTTT, API call method or both. My reset events look like this.
Note for triggers I'm using MyMonitor to set Homeseer virtuals based on state info from Blue Iris. You could also use the Blue Iris Plug-In by Highpeak Software plugin. I have multiple Blue Iris servers though and the Highpeak plugin only supports one. Also MyMonitor can run on a seperate PC which can be helpful if load or number of plugins is an issue. Plus of course MyMonitor lets you monitor about anything accessible from the network and it is open source / free to use.
Saturday, November 10, 2018
Triggering Homeseer from Blue Iris
Using MyMonitor is is more reliable and more automatic than just using trigger URLs but using triggers URLs is quick and simple.
First you need a virtual object to update. An easy way to do this is using the createMonDev method in MyMonitor.vb call it from an event with Parameters of Name,type like
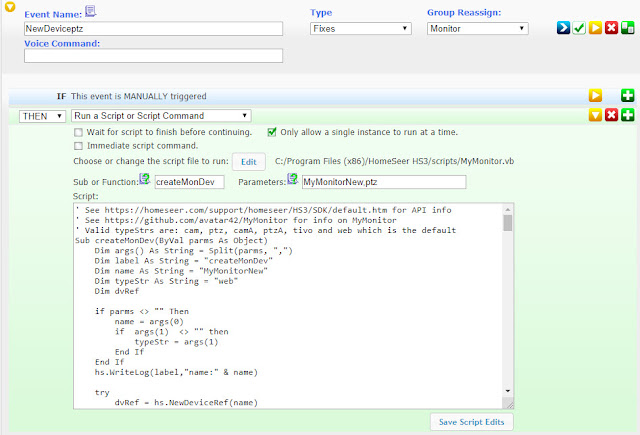
This gets you a device similar to this
 Note this a full MyMonitor object. If you are just using trigger URLs you only need status for values 0, 3 and 4. Note the ref ID of the object created http://10.10.1.45/deviceutility?ref=5596&edit=1
Now open the camera properties and set action on the Alerts tab for the profiles you use
Replace the bits in yellow with the value for your setup.

The URLs are set via Configure

Now set the Watchdog URLs


First you need a virtual object to update. An easy way to do this is using the createMonDev method in MyMonitor.vb call it from an event with Parameters of Name,type like

This gets you a device similar to this

Now open the camera properties and set action on the Alerts tab for the profiles you use
When triggered
HS_IP/JSON?user=USERNAME&pass=PASSWORD&request=controldevicebyvalue&ref=5596&value=3
When reset
HS_IP/JSON?user=USERNAME&pass=PASSWORD&request=controldevicebyvalue&ref=5596&value=4

The URLs are set via Configure

Now set the Watchdog URLs
Watchdog triggered (offline)
HS_IP/JSON?user=USERNAME&pass=PASSWORD&request=controldevicebyvalue&ref=5596&value=0
When reset
HS_IP/JSON?user=USERNAME&pass=PASSWORD&request=controldevicebyvalue&ref=5596&value=4
If you want to go the other way (trigger cameras from Homeseer) look at this post in my camera blog.
Wednesday, April 18, 2018
Answer to "I'm new what camera / automation should I get?"
Before even starting to ask a "what's best" question you need to gather some details to make your question answerable in any useful way. There is not going to be any one answer, only one what best fits your specific situation from your point of view. While there might be several OK answers (in your opinion) there is never a general answer that works for every person. So ask yourself these questions first:
- What is it you want to do? Something vague like something that looks cool is not useful. "I want my house to turn everything off and set the alarm when I leave", would be. Or even something as simple as I want to see the driveway camera on X when someone arrives or when it sees motion. (two diff things by the way.)
- What do you have? Are you starting from scratch or do you already have an investment in a good bit of gear. Maybe you have stuff but are cool with dumping if need be. Factor in time and money here.
- What skills and or eagerness to learn do you have? Are you good at programming or hardware building? Are you looking to learn or are you looking for something as easy as possible? The people you will get answers from will be from all over the spectrum, Something one might do everyday will be unthinkable to another but both will throw suggestions at a general question.
- What kind of budget in money, time and style? Note here often you can save a bit of money building something but the extra time required and or the lack of style of the finished product will make the savings over a produced item seem worthless. This is VERY subjective. Even if you are not rich you will be making compromises. You need to decide what you can live with.
That said there are some basic things to keep in mind especially with cams.
Wire your cams. You have to run power to them anyway (do not get battery powered ones) so you might as well run cat 6 and power them through that.
Only record to the cloud as a backup. Get a NVR like Blue Iris to record local.
Record 24/7. Recording on motion will get most stuff but usually misses that one thing you REALLY needed to get.
Think about what you want the camera for. 720p is fine if you are mainly looking at stuff up close or letting you know someone is there but if you want to have a pic the police can use you will need something with enough pixels to work with at the max distance you might see them at. This applies to viewing angle as well. The wider the angle the thinner you are spreading those pixels.
Cams that also record to an internal card are good idea too but as a backup. Cameras should only talk to the NVR and be blocked from talking to the outside world.
I have a lot of notes, tips and compare pics of most of the cameras I've tried in my other blog Security Cam 101 give it a look to see what looks like a fit for you.
Automation is VERY subjective.
People call anything from simple remote control of a bulb to multi room scenes that happen automatically based on conditions automation. Odds are you looking to do is somewhere between remote control and what is possible. If you are reading this odds are what is possible is way more than what you might think. The only real suggestion here is get a hub and look for devices that work with multiple hubs to keep your options open. This blog lists a lot of the stuff I've tried and some of the issues I've dealt with. I also have a matrix of hubs and devices I've tried tracking how well each worked. As a first hub I generally suggest SmartThings or Vera as they are both fairly cheap and simple to set up. I've also heard good things about Wink and Hubitat but have not tried them myself. When you are ready to go whole hog you can upgrade to Homeseer which costs more and is aimed more at the installer market but does almost anything you can think of except talk directly to Zigbee devices.
Gateways / sub hubs like Hue are good too just try and get ones that do not need to link through the cloud.
In a similar vein you can use your automation sensors for an alarm system if you really do not think you need an alarm and just want something simple. But if you think you need an alarm get one that is separate but talks to the hub you decided on above.
In a similar vein you can use your automation sensors for an alarm system if you really do not think you need an alarm and just want something simple. But if you think you need an alarm get one that is separate but talks to the hub you decided on above.
Tuesday, January 21, 2020
Things to monitor and control
People often ask for ideas of what to do next. I say if you can count your devices, you need more.
Some of the things I'm doing:
- Smart bulbs and light switches of course mostly controlled by motion and or contact switches
- Alarm system
- TV and other AV gear mainly via Harmony hubs
- Voice assistants
- 61 security cameras (at the moment and not including the Ring doorbell as it is cloud based) linked into HA motion sensors, alarm system and AV controls to mark video and send triggered cams to main stream video dependent alert and alarm levels.
- Indoor and component temperature monitoring, smart thermostat and window AC and fan controls.
- Weather monitoring
- Watering system
- Tons of monitoring, as that is the bit that people always seem to forget, Which tells me is something is offline or a battery is low or is signalling replacement as in the case of a UPS. This ranges to things like shows being short on a TiVo which would indicate the cable company knocked the tuner offline with an update again and over loaded CPUs on PC and updates need applied. I even wrote a program to make adding things to monitor easier.
Still on the to-do list:
- Find smart door locks that can tell me the doors lock status at a reasonable price. The weather is so variable here in central Texas, heat and humidity wise that exterior doors change shape enough that doors tend to need a push or a pull for the dead bolt to align so I've given up on actually being able to lock/unlock them. Wish now I'd wired the dead bolt holes with recessed switches.
- Open garage door on command though mainly for the "Goodbye" routine that puts the site into away mode only after checking the alarm is ready to arm. Seen too many glitches to feel good about it opening automatically on return.
- Smarter motion recognition. Ultimate goal is to be able to have it tell me what is sees moving and tell me where a pet was last seen. Would prefer a Blue Iris plugin or similar but might look at a separate system like YOLO I can send triggered images to.
- Want GPS tracking of pets when practical. Which seems soon.
- Of course wild critters are getting to be big deal here which accounts for many of the cameras. For example I recently added 4 just trying to find a snake that got in the shop. Lately feral hogs are the thing.
- Well and water softener monitor so know if the well has tripped, a filter has clogged or a pipe is leaking / burst.
Other stuff some have mentioned but not on my list:
- Smart or controllable blinds.
Tuesday, May 28, 2019
Dakota mailbox and driveway alert system
I started this awhile back. Then the Dakota receivers became unavailable so I thought I'd wait till the new model came out. Unfortunately after talking to Guardline it appears that will not be happening. It sounds like there will be no compatible receiver coming. Probably no new model with multiple relay outs either though they hinted a model that talks to home automation might be in the works. So I figured I should go ahead and post this for those that want to snap 2500 up before they are gone. Guardline does make a model with 1/4 mile range and talks to 16 sensors but only 1 relay out. You are expected to memorize which tone means what of those 16 areas was triggered.
Most Dakota 2500 receiver bundles are now going for several times the MSRP. For example the receiver / contact sensor I used in my mailbox was just $75 a little while back. At the time I'm writing this the cheapest option is to get the underground bundle from Guardline directly for $240 and toss the sensor unless you need it and add contact sensor for $35. (While you can. Some are already trying to get over $80 per sensor.) After a fair bit of research I'm not finding any decent replacement options as Dakota seems to have been to only one with multiple relay outs much less also supports contact sensors or talks directly to home automation. So you best option now for a mailbox sensor is to buy a 4000 bundle for each sensor you wish to install at like $90 a piece though those have no relay out. After distributors clear the last of the Dakota 2500 stock there might not be an option for awhile so I broke down and bought a "backup receiver" and several sensors. I wanted to add more sensors to the south field anyway with all the "interesting creatures" (deer, cows, wild? pigs, coyotes....) passing through there lately so finding them on video is easier. PIR motion sensors can be way more sensitive without the false alarms most video systems can give you since they see heat diffs. Of course you want both for best results.(See Paranoia definitely pays when it comes to recording.) Hopefully by the time one goes there will be better options. Or at least by the time both go. Kind of amazed there isn't one already.
Update: after ordering the above mentioned receiver / probe bundle I found the receivers on their own for just $70. The site is damn slow. I ordered yet another one at that price so I should be good and well covered. But they just cancelled the order.
Update: Dakota has release a 4000 series receiver (RE-4000 Plus) which has 2 relay outputs. It support 16 sensors each with its own chime type. It still not the one relay per sensor of the 2500 but better than 1 for all of them. And it still will not use 2500 series sensors of course.
Update: 10/17/2019 Google Buy had a receiver for sale for under $70 but that order too was cancelled after a week. I did find a 2 pack of motion detector on Amazon for $105 for spares. I setup the spare receiver I bought with 4 of the motion sensors I had bought previously and caught this guy on video trying to steal one. Makes me think I need some more monitoring the north property line as this is second time someone has come in that was and I did not get and alert quick enough to get down there before they were gone. How good are the motion sensors?
Here are the parts I used:
Dakota Alert UTDCR-2500 Duty Cycle Universal Kit, One UT-2500 & One DCR-2500 (see update above)
Dakota Alert DCMT-2500 Transmitter 2500' (Green)
Dakota Alert 2500 Wireless Motion Detector, Black (PR-2500)
Dakota Alert UT-2500 2500 Wireless Universal Transmitter
Dakota Alert DCPT-2500 Duty Cycle Probe Transmitter 2500'
Dakota Alert BBA-2500 Break Beam Alert Kit, One BBT-2500 & One DCR-2500 (Note was same price as beam sensor alone)
Step2 531700 MailMaster StoreMore Mailbox
Ecolink Z-wave Plus Rare Earth Magnets Door & Window Sensor, White & Brown (DWZWAVE2.5-ECO)
ALEKO 5BS-MC13S-M 5 Sets of Magnetic Contact Reed Switches Security Alarm Contacts For Doors Windows and Other Applications
I would suggest upgrading the door switches to
SM-226L-3Q Seco-Larm Overhead Door Mount N.C. Magnetic Contact w/ 3 Wires for N.O./N.C. Applications
And adding a deck box for parcels with signage.
Pic of Ecolink insides with terminals showing.

Sensor mounted inside. Running the wire inside the shell would look better and probably hold up better but there is not easy way to do it without making some good sized holes in the shell. Note a switch on each door wired in series to sensor.

After being swiped by semi truck pulling out.

Snapped back together almost cannot tell it was hit.
 I turned it around after this (effectively moving it back close to a foot) and added a more signage for all the delivery drivers that could not figure out all mailboxes in rural areas are on one side of the street.
 I also have a similar set up in the parcel box just inside the gate along with motion sensors to tell me if some one / thing comes through the gate and if they decide to go up the driveway to the house.

Why 2 signs? Because with just one things like this happen.

I suggest you seal the holes in the parcel box as things may nest in there. I almost grabbed the snake that left this skin behind when I reached in for a package the day before. Note the sand looking stuff is Snake-B-Gon.

Alarm Center Seco-Larm SM-226L-Q Mount Magnetic Contact, NC
I also did a cleaner job this time running the lines inside the walls instead of taping to the sides.
I removed the magnets from their mounts and glued to the doors. I added a bolt just to be safe. Note I had to cut the door a bit to make them fit.
See how much cleaner this looks plus there is less to snag on when they deliver the mail. And screws hold it much more firmly in place that the stuck on ones I used before.

The fit does not even need to be that tight since it is made for garage doors which tend to vary over the seasons.

I decided to go horizontal with the transmitter this time. I would have liked to stick it the side channel but it was slightly too thick. I used mounting tape and single screw to let it have some give if hit hard by something.

Here is what it looks like in place. Note these pics are pre mounting on the post but to mount on the post I need to remove the screw.

Lastly here is what the wiring looks like inside viewed from the post hole. You can see the transmitter mounting screw which will go into the post once the mailbox is on the post.

Now for the bad news. I thought I'd double check the 2 spare transmitters that did not seem to work when I tried them. Since I had the mailbox in I checked the switches matched, they did. Then tried flipping them back and forth to make sure they were in place, still nothing on either transmitter. Lastly I tried multiple batteries including the one working in the mailbox still no go. I sent off and email to support to see if they have any ideas.
Most Dakota 2500 receiver bundles are now going for several times the MSRP. For example the receiver / contact sensor I used in my mailbox was just $75 a little while back. At the time I'm writing this the cheapest option is to get the underground bundle from Guardline directly for $240 and toss the sensor unless you need it and add contact sensor for $35. (While you can. Some are already trying to get over $80 per sensor.) After a fair bit of research I'm not finding any decent replacement options as Dakota seems to have been to only one with multiple relay outs much less also supports contact sensors or talks directly to home automation. So you best option now for a mailbox sensor is to buy a 4000 bundle for each sensor you wish to install at like $90 a piece though those have no relay out. After distributors clear the last of the Dakota 2500 stock there might not be an option for awhile so I broke down and bought a "backup receiver" and several sensors. I wanted to add more sensors to the south field anyway with all the "interesting creatures" (deer, cows, wild? pigs, coyotes....) passing through there lately so finding them on video is easier. PIR motion sensors can be way more sensitive without the false alarms most video systems can give you since they see heat diffs. Of course you want both for best results.(See Paranoia definitely pays when it comes to recording.) Hopefully by the time one goes there will be better options. Or at least by the time both go. Kind of amazed there isn't one already.
Update: after ordering the above mentioned receiver / probe bundle I found the receivers on their own for just $70. The site is damn slow. I ordered yet another one at that price so I should be good and well covered. But they just cancelled the order.
Update: Dakota has release a 4000 series receiver (RE-4000 Plus) which has 2 relay outputs. It support 16 sensors each with its own chime type. It still not the one relay per sensor of the 2500 but better than 1 for all of them. And it still will not use 2500 series sensors of course.
Update: 10/17/2019 Google Buy had a receiver for sale for under $70 but that order too was cancelled after a week. I did find a 2 pack of motion detector on Amazon for $105 for spares. I setup the spare receiver I bought with 4 of the motion sensors I had bought previously and caught this guy on video trying to steal one. Makes me think I need some more monitoring the north property line as this is second time someone has come in that was and I did not get and alert quick enough to get down there before they were gone. How good are the motion sensors?
 |
| Motion sensor on large tree center caught this squirrel running across the clearing before jumping on the table. Though they are generally not tripped by wind or shadow since they watch IR light. |
Here are the parts I used:
Dakota Alert UTDCR-2500 Duty Cycle Universal Kit, One UT-2500 & One DCR-2500 (see update above)
Dakota Alert DCMT-2500 Transmitter 2500' (Green)
Dakota Alert 2500 Wireless Motion Detector, Black (PR-2500)
Dakota Alert UT-2500 2500 Wireless Universal Transmitter
Dakota Alert DCPT-2500 Duty Cycle Probe Transmitter 2500'
Dakota Alert BBA-2500 Break Beam Alert Kit, One BBT-2500 & One DCR-2500 (Note was same price as beam sensor alone)
Step2 531700 MailMaster StoreMore Mailbox
Ecolink Z-wave Plus Rare Earth Magnets Door & Window Sensor, White & Brown (DWZWAVE2.5-ECO)
ALEKO 5BS-MC13S-M 5 Sets of Magnetic Contact Reed Switches Security Alarm Contacts For Doors Windows and Other Applications
I would suggest upgrading the door switches to
SM-226L-3Q Seco-Larm Overhead Door Mount N.C. Magnetic Contact w/ 3 Wires for N.O./N.C. Applications
And adding a deck box for parcels with signage.
Battery life
In the just weird department, the battery ran out in my first Dakota Alert DCMT-2500 Transmitter after almost a year. I stuck in a new battery and it kept tripping constantly. Even though the battery tested OK I put a newer one in and it worked fine. I'm guessing I just got a bad battery. Almost two years on now I've only needed to replace a battery in one of the motion sensors since.Setup
Should be pretty straight forward. Just follow the instructions for setting channels on the sensors to pair the with the receiver. Wire the Ecolink sensors to the relay outs on the receiver and pair the Ecolinks with your home automation. Here is an example of how trigger Blue Iris cams when a Dakota sensor is tripped.Pic of Ecolink insides with terminals showing.

Sensor mounted inside. Running the wire inside the shell would look better and probably hold up better but there is not easy way to do it without making some good sized holes in the shell. Note a switch on each door wired in series to sensor.

After being swiped by semi truck pulling out.

Snapped back together almost cannot tell it was hit.


Why 2 signs? Because with just one things like this happen.

I suggest you seal the holes in the parcel box as things may nest in there. I almost grabbed the snake that left this skin behind when I reached in for a package the day before. Note the sand looking stuff is Snake-B-Gon.

Updated version / info:
Got tired of the switches sticking so I upgraded them. I used these which had worked so well on the garage door.Alarm Center Seco-Larm SM-226L-Q Mount Magnetic Contact, NC
I also did a cleaner job this time running the lines inside the walls instead of taping to the sides.
I removed the magnets from their mounts and glued to the doors. I added a bolt just to be safe. Note I had to cut the door a bit to make them fit.
 |
| Note this is the door that got hit by the truck which is why the cross support is twisted. |
See how much cleaner this looks plus there is less to snag on when they deliver the mail. And screws hold it much more firmly in place that the stuck on ones I used before.

The fit does not even need to be that tight since it is made for garage doors which tend to vary over the seasons.

I decided to go horizontal with the transmitter this time. I would have liked to stick it the side channel but it was slightly too thick. I used mounting tape and single screw to let it have some give if hit hard by something.

Here is what it looks like in place. Note these pics are pre mounting on the post but to mount on the post I need to remove the screw.

Lastly here is what the wiring looks like inside viewed from the post hole. You can see the transmitter mounting screw which will go into the post once the mailbox is on the post.

Now for the bad news. I thought I'd double check the 2 spare transmitters that did not seem to work when I tried them. Since I had the mailbox in I checked the switches matched, they did. Then tried flipping them back and forth to make sure they were in place, still nothing on either transmitter. Lastly I tried multiple batteries including the one working in the mailbox still no go. I sent off and email to support to see if they have any ideas.
Monday, June 12, 2017
Added Rachio Smart Sprinkler Controller, 8 Zone 2nd Generation
Rachio Smart Sprinkler Controller, 8 Zone 2nd Generation, Works with Amazon Alexa
I bought mine the end of May when they were $50 off which made it as cheap as any of the other I was looking at and it was a done package unlike many of the others. Though some of the others, like OpenSprinker options, looked like they might do more IF you can put in the time. For instance you will probably want to mount it outside which means getting a water proof case. You can get the Rachio Outdoor Enclosure, for 2nd Generation Sprinkler Controller for the Rachio but will need to use something generic for OpenSprinkler like Orbit 57095 Sprinkler System Weather-Resistant Outdoor-Mounted Controller Timer Box Cover. You will also need from valves and a manifold. You can go with something mostly preassembled like Orbit 57253 3-Valve Heavy Duty Preassembled Manifold but the downside of this is the valves have connectors that are proprietary so you are locked in. I went with Orbit 57280 Female Pipe Threaded Auto Inline Sprinkler Valve, 3/4" that left all my options open down the road. I also used unions to make them simple to swap out. I also added a dump valve at the bottom so I can easily drain the system in the winter.
Some of the other bits:
Dixon BA776 Brass Fitting, Adapter, 3/4" GHT Male x 3/4" NPTF MaleDixon BMA976 Brass Fitting, Adapter, 3/4" GHT Female x 3/4" NPTF Male
Homewerks Worldwide 1-in dia PVC SCH 40 Union
AMERICAN VALVE 1-in PVC Sch 40 Socket In-Line Ball Valve
LASCO 1-in Dia x 3/4-in Dia PVC Sch 40 Bushing
LASCO 1-in Dia x 3/4-in Dia PVC Sch 40 Adapter (not pic on website is 3/4 to 3/4 as of this writing)
Charlotte Pipe 5-Pack 1-in dia PVC Sch 40 Tees
LASCO 1-in Dia 90-Degree PVC Sch 40 Slip Elbow
1-in x 10-ft 450 Schedule 40 PVC Pipe
Yardsmith Yardsmith Zinc Goose Neck Hose Connector
Blue Hawk 0.6-in x 43-ft Plumber's Tape
In the end 4 zone's worth of plumbing will set you back another $150 or so.
Some screen shots
This is what the web dashboard looks like

You can even add a customized sprinkler type. I found the Precip Rate for a soaker hose in one of the forums.

One thing I should point out is the blue icon in the lower right. This brings up a remote for manual control.

This is mainly useful in the phone app for testing and turning off the sprinklers when you are in the garden doing stuff.
Why would I want this over a simple timer setup?
The big thing is Flex watering that takes weather, soil type, sprinkler type and area covered into account. Instead of watering a zone for a set amount of time then the next, it calculates how much water should be needed given all the factors them divides that into sub cycles and rotates watering the zones to reduce run off. This might make getting accidentally hit by unexpected watering more likely but should reduce water usage and keep the plants at optimal moisture levels.Then there are all the integrations.
Alexa has a skill to talk directly to it so you can override the watering. With flex watering this can come in real handy. It also supports Google Home.
It talks to Nest which it is supposed to turn on the sprinklers if your Nest Protect senses a fire.
Of course there is IFTTT integration which lets you talk to lots of things.
Homeseer can talk to it directly with the ultrarachio3 HSPI plugin. The plugin creates 55 devices (with 8 zone Rachio) that lets you monitor and control everything. Note triggering a Homeseer event via IFTTT versus this plugin appears to be about 10 minutes behind the plugin. So the plugin might well be telling you that watering has stopped before IFTTT has told you is has begun.
It also talks directly to SmartThings. Detailed instruction for that can be found here.
I'm not seeing anyway to make it work Vera. It is a Wi-Fi interface though so that is pretty much expected. Same goes for the closed Lowes Iris system. Rachio does have a public API though so you could probably cook your own if you have the time.
Next step move my Davis soil moisture sensors to match the new zones and get the main unit better sun exposure. That will let me better tweak the settings and monitor for problems.
Subscribe to:
Posts (Atom)